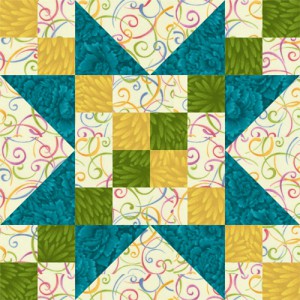
The Frayed Sawtooth Star quilt block pattern is suitable for any quilt, from traditional to contemporary and from scrappy to orderly. The quilt block’s appearance can be changed dramatically by simply altering the contrast among patches. Mix up the fabrics as much as you like to create a unique look that suits your decor.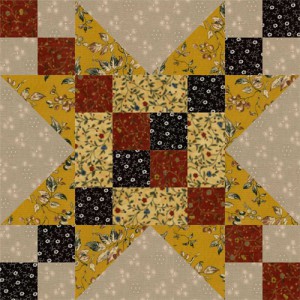
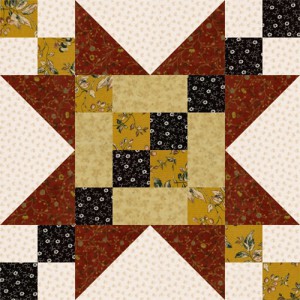
The first example of Frayed Sawtooth Star, shown right, has star tips that aren’t quite as predominant as other variations. Instead, the diagonal red squares and black squares stand out, where they ultimately create a strong diagonal flow in the quilt.
The cutting instructions refer to this first layout but feel free to change the fabrics to suit your needs. Two more layout examples are at the bottom of the page.
Flying Geese Star Tips
Star tips are easy to create with the quick pieced flying geese method, and there are (at least) two ways to quick piece the geese.
- For one method, we sew a seam along the diagonal centers of squares positioned at the ends of background rectangles. Clipping occurs beyond each seam, so there’s some fabric waste with this method, but it’s a good choice for scrap quilts when you’re drawing patches from a stash of fabric.
- The second method creates no waste, and although quilters sometimes think it is a more difficult technique, it’s truly a simple way to make flying geese. I recommend the no waste method when you want to make four or more identical flying geese.
Cutting Instructions for the Sawtooth Star Quilt Block
Since many of our readers make scrap quilts, we’ll use the rectangles-and-squares flying geese method. I rarely use solid color fabrics for my quilts, but do recommend you choose a variety of print scales, along with tone-on-tone fabrics, which appear to be solid when viewed from a distance — a pattern is revealed on closer inspection.
For One 12-inch Quilt Block
Neutral print background fabric:
- (4) 3-1/2″ x 6-1/2″ rectangles
- (2) 2″ x 9″ strips
Gold print star tip fabric:
- (8) 3-1/2″ x 3-1/2″ squares
Black print fabric:
- (1) 2″ x 9″ strip
- (2) 2″ x 4-1/2″ strips
Red print fabric:
- (1) 2″ x 9″ strip
- (2) 2″ x 4-1/2″ strips
Lighter print fabric to surround center four patch:
- (2) 2″ x 3-1/2″ bars
- (1) 3-1/2″ x 4-1/2″ strip
Make the Four Patch Units
Use a quarter inch seam allowance throughout unless instructed otherwise.
Four patch units are used in the quilt block’s corners and again at its center, although the center four patch is framed.
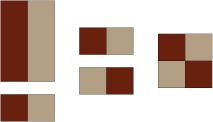 Sew a 2″ x 9″ red strip lengthwise to a neutral strip of the same size. Press seam allowance towards the red strip.
- Square up one end of the strip set, removing uneven edges to put the end at a 90-degree angle with its long edge. Beginning at the squared up end, cut four 2″ segments from the strip.
- Pair two of the segments, but flip one around so that like-fabrics are at a diagonal from each other. Sew the two segments together to create a red/neutral four patch unit that measures 3-1/2″ x 3-1/2″. Repeat to make another four patch unit.

- Sew a 2″ x 9″ black strip to a 2″ x 9″ neutral strip to create a second strip set. Press seam allowance towards the black strip. Square up the end, cut four 2″ segments and create two more four patch units with like-fabrics on the diagonal.
- Make a third strip set with the 2″ x 4-1/2″ red and black strips. Create one four patch unit from the two 2″ segments cut from this strip set (not shown here, see below, assembled as other four patch units).
- Sew a 2″ x 4-1/2″ red strip lengthwise to the long side of the 3-1/2″ x 4-1/2″ lighter print. Sew a 2″ x 4-1/2″ strip to the opposite side of the wider fabric. Press seam allowances towards the wider strip.
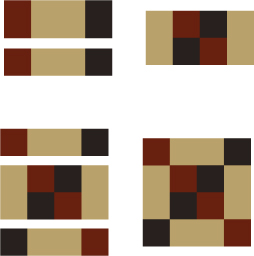
- Square up one end as before and then cut two 2″ segments from the strip set.
- Sew a 2″ x 3-1/2″ bar to opposite sides of the black/red four patch unit as shown. Press seam allowances towards the bars.
- Sew a step 7 segment to the top of the step 8 unit, taking care to position like-fabrics to flow in a diagonal line as illustrated. Press. The new unit will be used at the quilt block’s center and should measure 6-1/2″ x 6-1/2″.
Sew the Flying Geese
I mentioned two methods that can be used to make flying geese. For this block, we’ll sew a diagonal seam to connect squares to each end of each background bar, and then trim away the excess portion of the square.
If you prefer to use the no-waste method, refer to the no-waste flying geese tutorial on my About.com Quilting website. Cutting instructions differ.
- Draw a diagonal line from one corner to the opposite corner on the reverse side of each 3-1/2″ x 3-1/2″ square.

- Follow the instructions in my quick pieced flying geese article to sew a square to each end of a 3-1/2″ x 6-1/2″ gold bar. Remember that the seams are sewn directly on the line for this method. An illustration of steps is included with the article.
- The resulting four flying geese units will measure 3-1/2″ x 6-1/2″ and look like the illustration shown here.
Assemble the Frayed Sawtooth Star Quilt Block
- Arrange the patchwork components you’ve created into three rows as shown. Take care to position the four patch units so that their red squares and black squares all flow in the same direction.
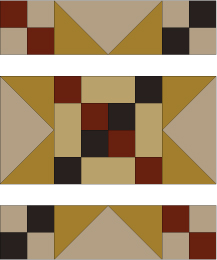
- The gold triangles of flying geese units point outwards. Try flipping them around to point towards the center of the block. Do you like that look better? If you’re making a quilt from many Frayed Sawtooth Star quilt blocks you could alternate the geese positions from block to block to create more interest.
- When happy with the layout, sew the components in each row together. Press seam allowances away from the flying geese units. Join the rows, matching seam intersections.
- Press. The Frayed Sawtooth Star block should measure 12-1/2″ x 12-1/2″.
Two Layout Variations of the Frayed Sawtooth Star

